
What It Does
The Postigniter API lets your own tools create, schedule and publish posts to your connected Facebook, Instagram and YouTube accounts. It works with n8n, Make, Zapier or custom code. Webhooks let those tools know the moment a post is published or fails.
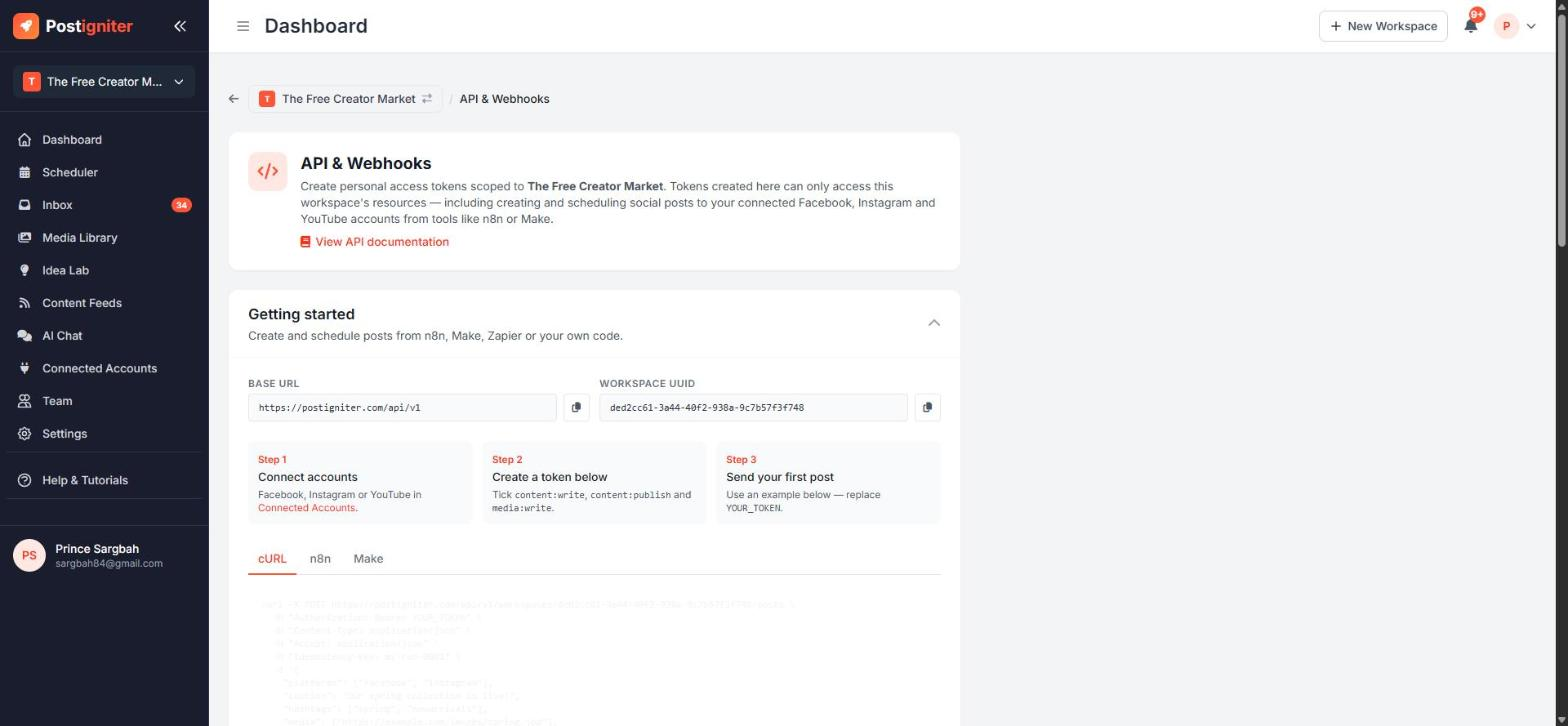
Open it from ⋮ → API & Webhooks on the dashboard, or Settings → API & Webhooks.
Who can use it: API publishing and webhooks are available on paid plans to the workspace owner and Co-owners.
Getting Started
The Getting started panel has everything prefilled for your workspace:
- your Base URL and Workspace UUID, each with a copy button
- ready-to-paste examples for cURL, n8n and Make
- the list of available endpoints and the permission each one needs
Follow the three steps:
- Connect accounts — make sure Facebook, Instagram or YouTube is connected.
- Create a token — tick
content:write,content:publishandmedia:write. - Send your first post — use one of the examples, replacing
YOUR_TOKENwith your token.
Creating a Token
- Under Create a new token, give it a name, for example Zapier — TrueLiberia.
- Tick the permissions it needs:
content:read— read connected accounts and postscontent:write— create, edit and delete draftscontent:publish— schedule and publish postsmedia:write— upload images and videoswebhooks:manage— manage webhooks
- Click Create token and copy it straight away. It's only shown once.
Tip: leave content:publish unticked to make a drafts-only token. Posts then wait in Postigniter for you to review and schedule.
Revoke a token at any time from Tokens for this workspace.
Scheduling Options
When you create a post through the API, choose:
now— publish immediatelyat— publish at a specific timenext_slot— your next recommended posting timedraft— save as a draft
Webhooks
- Under Webhooks, paste the URL of your n8n Webhook trigger or Make Custom webhook. It must be HTTPS.
- Choose the events:
post.publishedand/orpost.failed. Leave Only posts created via the API ticked, or untick it to hear about every post. - Click Add webhook and copy the signing secret. Every request is signed with a
Postigniter-Signatureheader so you can verify it came from us.
Use Send test to check your endpoint. If an endpoint keeps failing, the webhook is disabled automatically; re-enable it once it's fixed. You can have up to five webhooks per workspace.
Full Documentation
Click View API documentation for the complete reference, including request and response examples and the OpenAPI spec you can import into n8n or Postman.
Tips for Best Results
- Send an
Idempotency-Keyheader when creating posts so a retried request never creates a duplicate. - Use
next_slotto let Postigniter space your automated posts at the best times. - Create one token per tool. That way you can revoke one integration without breaking the others.